

There are some of you out there who aren’t weird like me. You don’t enjoy kneading bread. This recipe is for you! I got this recipe from my friend, Angela. Angela is a super-mom. She can do anything. This is how she makes her bread, and I have to admit – it’s nice. It lets you do other things in the kitchen while the mixer is doing all the work! Too bad I can’t hire the mixer to dust my house. It makes nice, big loaves that are great for sandwiches. Because of how it’s made, a lot of people just call this “Kitchen Aid Bread”, so let’s learn how to mix it up! (see what I did there?)
Ingredients

We need bread flour, yeast, eggs, salt, water, sugar, and oil. Pretty simple. This is stuff you should keep around your house if you ever plan to make bread. I grind our own wheat using a Nutrimill, but as long as you’ve got bread flour, any kind should work here for kitchen aid bread.
The Mixer

This is the mixer I had when I first started making bread this way. It’s not a Kitchen Aid, but I loved it anyway. Sure, I wanted that nice, red, shiny Kitchen Aid but I chose this one instead. I saved for a few months and bought it at JCPenney, and it served me well for quite a while. It actually had more amps or horsepower, or pony watts, or something like that. (Insert Tim the Tool Man Taylor grunt.) It’s just proof that as long as you’ve got a mixer with the right attachments, you’re all set. We’ll be using the paddle and the dough hook attachments.
The Process

First we dissolve our yeast in the warm water. Remember what I’ve said before. WARM. Not hot. Do not commit yeast murder. Thou shalt not kill.

To the yeast mixture add the salt, oil, sugar, eggs, and 3 cups of the flour. Beat this with the paddle attachment for ten minutes. While it’s beating, do something constructive like wash the dishes, pick up dog food, or scrape old oatmeal off the underside of the table.

This is the dough hook. Yes, it looks scary. It makes you think about Peter Pan doesn’t it? It’s okay to admit it. Add the remainder of the flour and “knead” with the dough hook for another 10 minutes. Again, take this time to do something constructive – fold laundry, pry a baby off your leg, or eat a snack…not too much though because you have this magical kitchen aid bread coming!

See, here it is kneading. It’s an action shot. Sorry about the quality. I’m still working on how to take good photos of that. Imagine that you’re actually seeing it move. Move your head side to side. I promise it helps. Thanks.
Time to Raise

Ok, when it’s done you want to take it out of the bowl and put it into a large bowl that’s been greased. Turn the dough over so that it gets greased all over. Cover the bowl and place it in a warm place to double, about 45 minutes. I like to raise mine in the oven because the temperature is consistent when the light is on.
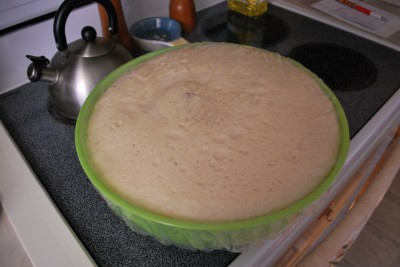
Unfortunately (although it happens a lot), I forgot mine was in the oven and got busy with Annie. I think she was taking all her shoes out of the drawer and hiding them in various places. As a result, when I remembered to go check, it had been over an hour and mine had risen…a lot. It almost came over the side. Do you remember that I Love Lucy episode where she’s attacked by the large loaf of bread? That’s what I was thinking about here. I punched it down and all was well again.
Turn it Out

Turn your dough out onto a floured surface and divide in half. Knead just a little bit and get the bubbles out. Angela’s recipe says “slap out the air bubbles.” I’ll just tell you – that is crazy fun!

Pro tip: go now to Amazon and buy yourself some really good loaf pans. They are worth every penny, and your bread (no matter how you make it) will turn out better. The ones I had when I captured this process weren’t that great, but now that I’ve upgraded, I’ll never look back!
Form your halves into loaves. Then, throw them into two 9 inch pans that have been greased or oiled. Next, turn over the loaves so they’re totally coated. Cover the pans and let the dough rise again until doubled. My kitchen was pretty hot, so it only took 30 minutes. This will vary based on the temp of your kitchen.

Ready to Bake
Here it is ready to go! Carefully move it to your 375 degree oven.

Now, bake the kitchen aid bread until it’s brown, about 30 minutes. Tap on it. When it sounds hollow, it’s done!
You can use a kitchen thermometer instead of tapping – 190 is the right temp for bread that’s done!
Let the bread rest in the pans for 10 minutes before you turn it out to cool completely.

I bet you feel like Martha Stewart right now – time to make some grilled cheese sandwiches!

Kitchen Aid Bread
Equipment
- kitchen aid mixer
- oven
Ingredients
- 2 packets yeast 4 tsp total
- 2 tsp salt
- 1/3 cup coconut oil
- 1/3 cup honey
- 2 large eggs
- 2 cups warm water
- 6-1/2 cups bread flour or white wheat flour I use hard white wheat berries
Instructions
- Pour warm water into your stand mixer bowl. Add yeast and stir around to dissolve.
- To this mixture add the salt, oil, honey, eggs, and 3 cups of the flour. Mix on speed 1 for 10 minutes, using the paddle attachment.
- Add the remaining flour and mix with the dough hook attachment for 10 minutes on speed 1. If it’s a little sticky, you can add a small amount of flour by hand, but no more than 1/4 cup.
- Put dough into a greased bowl, turning so surface is greased. Cover and let rise until doubled, about 45 minutes.
- Poke dough down and turn onto a floured surface. Knead or slap to remove air bubbles.
- Divide in half. Shape into two loaves and put into two greased 9 inch pans. Turn dough to coat surface in oil. Cover and let rise until doubled, about 45 minutes.
- Bake at 375 degrees for about 30 minutes or until loaf sounds hollow when tapped.
- Let rest in pans for 10 minutes before turning out to cool completely on wire rack.

Ok…wow! That’s awesome bread. Like others, it may have killed my mixer…but I’ve never had bread that good before. So next time when I make it, I can’t knead with my mixer…any thoughts on how to do it by hand…I can mix the first part, just not once the final flour is added. Any suggestions would be awesome.😊
A lot of times, newer mixers aren’t often strong enough for bread. 🙁
When kneading by hand, just knead until the dough springs back when you poke it with your finger. 🙂
Love this recipe! It has become my go-to bread recipe because it is so easy and delicious! …and today my teen son made it! Mom win!😀
Wahoo! Wahoo!
Would this recipe work with einkorn flour?
Einkorn behaves differently – do some research on Einkorn yeast bread on You Tube for some help!
Hi Stacy! My husband and I love this recipe! I have the same problem though each time I make it, my dough is still very sticky after 10 minutes of dough hooking it and I even add the extra 1/4 cup flour. Is there something else I can try? The loaves always turn out really well but I wasn’t sure if it should still be sticking to my bowl like it does. Thank you!
A wet dough is always better than a dry one – so as long as it’s working for you, I wouldn’t change it.
Made this bread today and it started going in the wrong direction when I added the 3 and a half cups of flour and it got so stiff, my mixer was burning, plus the dough was going up over the top of the attachment. What did I do wrong. Used all the correct ingredients and bread flour.
Thanks,
Lynda
Any time you have stiff dough, you can add a bit more water for the right consistency – but for me this dough is more wet than dry. I would double check your liquid and flour amounts next time. Altitude can make it act differently.
First time making bread. Made a few mis-steps, did not melt coconut oil prior to adding to mixture and did not use enough flour. But…came out great. Definitely will make this again!
WAHOO!!! Way to go!!!
I’m a little confused by the picture of all the ingredients in the first part of the blog – looks like vegetable or canola oil and plain sugar. But the recipe states coconut oil (yuck – i hate the smell) and honey. I guess I could use crisco and or butter? Thanks
I’ve changed our eating habits since the first post, so the recipe reads a little differently. We aim for healthy fats now. You could use butter, for sure. But if you get refined coconut oil, it will have no taste.
Can I decide dough raise dough and put half of dough in fridge to be baked couple days later
I have not tried that with this particular recipe.
I followed a link fom Mary at White cottage living on YouTube. She made it look so easy and I’m sure I could smell rhe bread through my phone because it looked so good! I can’t remember the last time I made bread-I’m 66 and there is way too much data bouncing around in my head- but I definitely going to make me some bread 😋. I had a cobalt kitchen aid but I gave to my daughter and bought me a complete set of KA appliances in Martha Stewart blue. My children were grown before I could afford one. My son actually bought me a second bowl with my name engraved on it. I was younger I had a mix master. My 10 yro was making a cake and she leaned to look in the bowl and her got caught and it wound her hair until her face hit the mixer. Thank God
the motor burnt up and it stopped. Always put you hair up before cooking.
Hey Melanie! Thanks for the hair tip! 🙂 I’m glad she was okay!
Oh my goodness! I do feel like Martha Stewart! I have never made homemade bread- mostly because of the time involved/kneading. I received a KitchenAid mixer for Mother’s Day- found your recipe and after reading – I said “I can do this!” – I just got the bread out of the oven and to me it’s absolutely perfect! Thank you for the complete how to- even using the oven/light worked perfectly! Thank you!
Hi! I just finished kneading this recipe with my KitchenAid mixer. No smell, no smoke. I think the problem is the popular Artisan mixer is underpowered. My mixer is a KitchenAid Professional 5 Plus, which has a more powerful motor. It’s a lift model instead of a tilt head. And it cost less than the Artisan. It has a 5-quart bowl so it’s not humongous but it handles everything I’ve thrown at it. I just bought it a year ago, so it’s not because it’s an older model. I used to have a Sunbeam McMaster, and even it had more oomph than the Artisan. I wanted a cobalt blue mixer so bad, but I wanted the power more!
MIXMASTER! 😄 😀😄😄😄
Mixmaster! 😄😄😄 Stupid autocorrect.
I learned to bake bread with my grandmother – now I’m the grandmother (and great grandmother) baking just one loaf instead of six loaves at a time. I put a saucepan of hot water on the oven rack beside the rising bowl of bread dough to maintain a warm environment. My new oven has an led light, so the heat that used to be generated by the oven light bulb isn’t there any more. Love this recipe, taste is similar to a dinner roll.
That’s so sad about the oven light bulb!
I have tried 4 recipes for while bread and none of them have worked for me. I have made this 5 time so far, and I am now making it twice a week. It is fantastic. I love it. It is so easy and delicious. I don’t need to try any other recipe for my every day bread. I actually stopped buying bread at the store. Thank you so much for this recipe. I love it!!!
I’m so glad you love it!!!
THANK YOU. FINALLY a KitchenAid Bread recipe that WORKS and doesn’t turn out like a giant yeasty f*&^ing crouton made of dark matter. Saved. Thanks again.
Looking forward to reading your tips/strategies!!!
Hope they were helpful! Thanks,
Julie, HH Team
My manual that came with my Kitchenaid says, “Do not use speed 1 to mix or knead yeast doughs.” And “ALWAYS use the dough hook to mix and knead doughs. Use speed 2 to mix or knead yeast doughs. Use of any othe speed creates high potential for unit malfunction.”
I would suggest to anyone to read your manual before using your mixer with this recipe based on step 3.
Just wanted to let everyone know this possibility.
Thanks for the helpful comment, Rachael! I guess I never read my manual thoroughly enough. Appreciate you sharing!
Julie, Humorous Homemaking Team
A question…can you tailor this recipe for a single loaf instead of the standard two loaves?
It depends on the size of your loaf pan. If you have a standard size loaf pan, just cut the recipe in half. If you have an oversized loaf pan, you could try the recipe as is. Just keep in mind you may need to cover the top of the loaf so it doesn’t get too brown before the inside is fully baked. Good luck,
Julie, Humorous Homemaking Team
My bread actually went over but oh my it smells so good. I haven’t ever attempted to make bread since I failed miserably about 10 years ago BUT! my sweet bf just bought me a mixer as an early christmas gift. I wish i could give people the smell thats in my house! Thanks so much for this simple recipe!
There is truly NOTHING like the smell of bread! It’s the best. I’m so glad to hear you’re giving bread making another try – good luck 🙂
Thanks for commenting,
Julie, Humorous Homemaking Team
Can you use regular flour instead of bread flour
Bread flour has a slightly higher gluten content, but you can definitely try the recipe with all-purpose flour. It should work out okay. But this recipe probably wouldn’t turn our properly using self-rising flour.
Julie, Humorous Homemaking Team
I am not having good luck with homemade bread mixer with my kitchen aid mixer, so I will have to try this recipe. Question, if I do not have coconut oil, can I use vegetable, or any other kind of oil? RSVP – Thanks
I don’t recommend vegetable or canola oils – not the best flavor or as healthy. But you could try sunflower oil, avocado oil, a light olive oil. Any of those should work! Thanks, Allan.
Julie, Humorous Homemaking Team
This is a great recipe! It definitely does rise fast. I left it to rise the second time and ran to pick up my daughter from work and stopped by the store. I got back an hour later and it was coming out of the pan… Lol. This is going to be my new go-to bread recipe for sure!
Thanks for taking the time to comment, Pam! I think it’s a pretty great recipe too. And that yeast – LOL – it has a mind of its own!
Julie, Humorous Homemaking Team
Does coconut oil need to be melted first?
I ADORE your sense of humor! Your directions made me chuckles, and I’m looking forward to making bread this afternoon.
Hi, my dough was really really sticky-to the point that a lot of it ended up in the bowl of the stand up mixer and on the punching board. I added the extra 1/4 cup of flour. I followed the recipe exactly. I am about to put the loaves in the oven. I hope it turns out ok :(. Thank-you, Nancy
It’s hard to be exact with flour measurements for bread because so many things can affect the dough – temperature of your kitchen, humidity, the texture of the flour, etc. I think you should be fine! Let us know 🙂
Julie, Humorous Homemaking Team
First time making bread without my bread maker. It launched off the counter today during the kneading cycle. It’s no longer with us. This is so delicious and easy. Believe it or not the dryer makes a great place for the dough to rise. I will be making it again.
I’ve heard that about the dryer, but I’ve never tried it! Thanks for the comment, Joe!
Julie, HH Team
Hi Stacy,
Your recipe is amazing and simple. My bread turned out fabulous! Thank you very much for sharing it?
I’m so glad the recipe worked for you! Thanks for your sweet comment 🙂
Julie, HH Team
It will work with less yeast!!! And a very forgiving recipe!
I have wanted to bake my own bread for awhile- not a fan of the ingredients list in commercial breads at my grocery. However my kids did not like any of my “rustic sourdough” or even baguette- y type. For now this is a great transition to sour dough. I have made it several times. I cut the yeast down to half a packet and let it rise for longer and kids still love it. I have also over proofed it many times – just punched it down and by let it rise again – it was delicious all the way!
My kids (crazy picky !) love it
Awesome Amanda! It’s always such a good feeling when we find a recipe we love and our kids will actually eat 🙂 Thanks for commenting!
Julie, HH Team
I AM GLAD YOU WENT TO EXPLAIN HOW TO DO IT IN THE MIXTURE IN THE KITCHEN-AID. MY COUSIN DID IT, BUT HE USED TOO MUCH OIL IN THE RECIPE. GLAD TO KNOW HOW TO DO IT NOW. THANK YOU A LOT. DS.
I ALSO HAVE 2 OF THE OLE FASHION KITCHEN AID MIXERS. I DID A LOT OF WEDDING CAKES. I HAVE TO DO THE RECEIPE YOU MENTIONED. THANK YOU FOR EVERYTHING.
Thanks for the comment!
Julie, HH Team
Yum yum yum!!! Used my new cast iron KitchenAid mixmaster. Perfect recipe. Perfect HUGe loaf.. hehe I didn’t read the last part after 45 min of rising to cut in half. I put it in a big bread pan thankfully and it turned out fabulous ❤️???
So glad you enjoyed this recipe! Thanks for commenting:) — Julie, HH Team
I really love the stand mixer bread. Making some right now. I’ll never make any other kind.
Thank you Aimee!
— Julie, HH Team
I made this bread yesterday. It turned out beautifully. I used EVOO since I did not have coconut or vegetable oil. I had to use a little more than the 1/4 flour during the last 10 minute session in the mixer. Nice flaky texture. I even made some honey cinnamon butter to spread on it!! YUMMY! I no longer need to look for an easy recipe….this one won! Thanks.
That’s so good to hear:) Thanks for your feedback, Stacey!
— Julie, HH Team
I made another batch and used whole wheat flour and it did not turn out very good. Any suggestions?
Was your bread more dense than before? Sometimes whole wheat flour yields baked goods and breads that are more dense than white wheat flour. If your bread turned out heavy, instead of tender, I would try using a mix of both all-purpose and whole wheat. I usually don’t do all whole wheat flour. I like to use 2 parts whole wheat flour and 1 part all-purpose flour.
— Julie HH Team
I just made this recipe, the bread turned out wonderful! I wil be making it again. thank you ?
I’m glad to hear it!
Does the coconut oil have to be melted so that it’s liquid first?
Yes, ma’am.
I didnt melt the coconut oil first and it turn
New out great! First time trying this recipe. I love how it turned out and will continue making this one. Thanks!
So glad it turned out well for you! Enjoy 🙂
Julie, HT Team
Really good recipe. The coconut oil and honey gives it a unique taste. The first batch (the second one is in the oven) was eaten avidly by my 10 y/o boy, 12 y/o girl and wife. The kids asked me last night whether they could take for school lunch a sandwich made with the delicious bread dad made”.
That was just too cool. Thanks for the recipe.
I’m glad you liked it!
Hi, I just bought a 6qt kitchenaid mixer and followed this recipe. The first one started smoking a couple minutes into kneading. I’ve just tried with the replacement and it started smoking 8 min into the 10min. Is it possible to email me? I would love to ask questions to see what I might have done wrong. Otherwise, I love the bread, my son’s and I devour it, and it’s amazing for dipping in soup and stew! I’d love to make it more often, but I keep burning out the motor. Both mixers are brand new.
I just found you on Facebook and plan to follow your recipes and meal plans there too. Thanks for all the hard work you put in sharing with us! 🙂 I’d love to be able to make this bread more often!
Upon speaking with Amazon (where I bought it from) there is a known issue with the mixer I have. Hopefully the next one isn’t part of the bad batch. I didn’t want anyone thinking your recipe was what killed the mixer. It’s a kitchenaid mess up. 🙂
I have recently heard that a lot of the new Kitchen Aid mixers aren’t made to handle dough – mostly just batters. 🙁
Sure, Jenna! You can email me any time. stacy AT humoroushomemaking DOT com
How do your homemade bread to keep it fresh? Thank you!
Either in a bag or in a bread box. 🙂 I have one that’s similar to the older Tupperware version.
I want to make this bread, but was wondering how you store your bread to keep it fresh. Thanks!!
I use a bread bag or I also have a bread box that’s similar to Tupperware.
Hello!
I tried this recipe and the result was just DELICIUS!!
I will keep making this bread for my family. Thank you!
I’m so glad to hear that!
I used all purpose flour and vegetable oil and it turned out great!
Thanks for letting us know, Brigitte!
Hi there,
Just trying the recipe now and wonder if I can just spril it into two rounded lumps and bake them on cookie sheets? I don’t have two pans.
Thanks!
Stacey
Sure! That should work great. Baking time may vary so aim for 190 degrees internal temp.
Warning to Aussies- this is cake bread.
I made a single loaf, with half white bread flour and half rye. Smelled delicious, looked great, but too sweet for sandwiches I’m afraid.
Ha ha! 🙂 It’s awesome to know what some people think – I’ve had lots of people tell me it’s not as sweet as store bread. I guess it’s just what you’re used to. 🙂 You could butter it up and have a lovely snack! Yum.
Ended up finding that this was delicious toasted with some marinated goats cheese and rosemary, so an unexpected breakfast treat 🙂
Oh man – that sounds amazing. I love goat cheese!
I’m wondering why coconut oil and will vegetable oil work?
Any oil will work. 🙂
This shouldn’t have worked, as I forgot the oil 20 mins after it started rising for the first time. I considered leaving it but read it may turn out dry, so I took it out, added oil and mixed it for a minute in the Kitchenaid. Well, it’s turned out lovely! A bit gooey, but in a good way. Lots of stretch. I used all-purpose flour, incidentally, and it worked fine.
I’m so glad, Lucy! I forget things sometimes too – but the good news is, even if it doesn’t turn out perfectly, it’s always good for croutons. Ha ha! 🙂
Made my first bread in kitchenaid mixer to dense and over cooked it rose but not good tasting .
I’m sorry you had that problem, Donna. Too dense usually means too much flour. Next time, cut back on the flour a bit and see if that helps. 🙂
I have a question, your dough isn’t as “risen” in the picture you took before putting it in the oven. Does your dough rise even more in the oven? I’ve been trying to different recipes for bread lately and found one that tastes awesome, but once it rises in the pans, it doesn’t rise anymore in the oven. Is that maybe because you have eggs in your recipe? (My certain recipe doesn’t have eggs)
Thanks 🙂
In your pans, it should be risen double. Then it will also rise a bit in the oven when it hits the heat. It’s called Oven Spring. 🙂
Can you freeze the dough after it has raised the first time
Yes. Then when it thaws, shape it and let it rise in the pan for it’s 2nd rise.
Can you make cinnamon rolls out if this dough?
Absolutely!
Would you recommend proofing the yeast (using 1/2 up water) and then adding the remainder of the warm water when adding the flour?
I tried proofing the yeast with 2 cups of water and it didn’t proof. I then tried with the package recommendation of 1/4 cup water for 2 tsp yeast and it seemed to proof well. Is the rea main in 1.5 cups water still needed?
If that works for you, it’s just fine. If you’re using instant yeast, you don’t even need to proof it.
For instant yeast, do you just mix the yeast with the flour? Then add dry to wet?
Even when I use instant yeast, I do it the same as with active. Just a habit.
Stacey,
I just came across your site a few days ago. I am working my way through your 100 Days of Meals. I love using my crockpot!
I have a question about this bread recipe. Can I use a gluten free bread flour mixture?
Thanks.
Robin
Hi Robin – I wouldn’t think so. Bread needs gluten to rise unless you’re using a lot of additional conditioners. I believe the Bread Beckers website has an online class on Gluten Free Baking.
Can I substitute ground wheat flour or 1/ wheat 1/2 white flour in this recipe?
I know you have wheat or white wheat in your recipe but I was thinking more of fresh ground wheat and not making it total wheat. Sorry if ramblin, long day.
Sure. I use fresh hard white wheat in it.
Hello! Is there a certain amount of time that the yeast needs to dissolve? Or is it simply, add to the warm water, stir a little and move to the next step? I’ve had other recipes that state it needs to sit for 5-10 mins.
Thanks!
That depends on the yeast. If you use instant yeast, you don’t need to let it dissolve.
Do u use plain flour or self-rising
Plain.
I didn’t have any honey so I used real maple syrup in its place. Here’s hoping it tastes as good as it smells.
I hope so too!
I’ve made alot of bread before and always try different recepies but this is by far the best!! I made one loaf and used the rest of my dough to make cinnamon buns and garlic bread sticks. Yummmmmy
Thanks alot
Oh and I followed the recipe exactly as written except I had to do the kneeding by hand my mixer couldn’t handle it but my daughter had fun helping squishing the dough.
Yeah, that’s the bummer about a lot of mixers these days – they aren’t always made to knead bread even though they say they are. A lot of them just don’t have enough horsepower. But, hand kneading is a GREAT workout! 🙂
I have tried several bread recipes and this one turned out by far the best! I proofed my yeast first. Used vegetable oil instead of coconut. I don’t own a stand mixer so I used a had mixer with dough hook attachment. Great recipe!
I’m so happy to hear that, Jennifer! #buttervehicle 🙂
How much oil
It’s listed in the recipe. 1/3 cup
I am confused. Do you make the bread with honey and coconut oil or sugar?
It uses honey and coconut oil – not granulated sugar.
I’m pretty sure I’m finally getting a wheat grinder for Mother’s Day, I saw it had been purchased on our Amazon account the other day (oops! Lol)
Anyway, what kind of wheat works best for every day use and bread making? Thanks!
WOW!! That’s a great gift! Here’s a post that you’ll find helpful: http://www.breadbeckers.com/blog/few-words-about-wheat/
So I tried the recipe. My second attempt at yeast bread in 60 years! I did modify the machine speed slightly to not lag the mixer & damage it. But stayed true to the plan for the most part. Used coconut oil but used Agave extract in lieu of honey/sugar. I did this recipe & a no eggs recipe. Both turned out great! But your recipe tuned out bigger, fluffier loaves. I’m sold! It was easy! Anyone with a stand up mixer can do it! Thanks! Never buying bread again. Now I’m going to break out the wheat grinder!:). Thanks!
We do love our wheat grinder here! 🙂
Do you think it would be OK to freeze a risen uncooked loaf?
No, you would not want to do that. You can freeze the dough, but don’t freeze it once it has risen.
Having used your recipe I now love making bread because it is the best I have ever made. One issue I have is during the cooling all of the great rise and shape caves back in about 10% .. Taking away the great rounded top. The flavor and texture is 100% but it would be better if I could keep that nice round top.Any ideas what is going on???
The caving in is usually a result of too much rise. Try cutting back your rise time just a smidge and see if that helps.
I’m new to bread making, I’ve been trying different recipes to see what works for me and what my family likes. We loved this recipie and my loaves were HUGE! So big we had to cut em in half for making toast lol!
My kitchen aid couldn’t stand the full recipie, it just wouldn’t knead it properly. So I halved it and was able to make a loaf and 6 buns. Perfection! This is my go to bread recipe! We may never buy bread ever again! Lol love it and thanks for posting!
That’s so great!!!!
Do you proof the yeast, or get right to it?
I do not proof the yeast, but that’s because I use instant yeast.
I am completely new to baking, so forgive my stupidity. I am trying to make this bread and I used half regular all purpose flour and half whole wheat flour. I have followed the recipe to the letter and my dough is in a bowl in the oven with the light on. It’s been in there an hour and doesn’t look like it’s risen at all. What am I doing wrong?
Hi Jennifer – so sorry this response is late…I had a baby. Ha ha! 🙂 How did the bread turn out?
Congratulations! It actually turned out great. I ended up letting it rise for several hours before it was ready. For the second rise, I turned my oven on it’s lowest setting and that sped it up. Thanks for all the help and a great recipe!
I’m so glad it worked well!
What kind of yeast do I use?
Active dry or instant. Either will work fine.
Made this recipe and absolutely loved it! Never buying store bought bread again!!!!
Awesome!!!!
After looking at dozens of recipes online that wanted ingredients I did not have like buttermilk etc. I tried your recipe. I used half and half all purpose and stone ground. added flax seeds with coconut oil, and farm fresh blackberry honey and used 1 teaspoon more yeast than recipe called for ( I lobe the taste of it). I let the water, yeast and honey “play” for about ten minutes until they were really frothy. They are in the oven now, raised perfectly within the allotted time. This recipe is going into our YUM YUM recipe binder. I KNOW the loaves will turn out great. Thanks for your FYI’s and TLC’s
I found you and this recipe yesterday. I made the recipe and had rave reviews last night from my hubby and a friend. Thank you! I make an artisan bread I really like but I think this will be my go to recipe for packing sandwiches as well as just bread & butter eating. I signed up on your blog…I enjoyed your writings.
I’m so glad, Jeannie! Welcome to our community!
Worst recipe EVER! Tried it, followed it to the word and I got an unrisen limp of dough. Went back through the recipe and double checked I didn’t miss anything…and again I had followed it just fine.
So sorry it didn’t work for you, Janet. I’ve used it many times and get a great result each time. Maybe it was your yeast?
Sounds like its user error. Everyone else on here loves it.
Can you use unbleached flour?
Sure!
Thank you for the recipe. I’m really excited to try this as I currently have it rising in my oven.
I was going to ask… do you think that my Kitchen Aid Artisan should be able to handle this mixing time with the amount of flour, or should I be taking breaks between the 10 minute mixing? My machine started to smell and even smoke a little bit on 1.
Should I maybe just half this recipe or can I use less flour?
I never had a problem with mine smoking…so if it’s doing that, it means it’s not able to handle the load. I would cut back to maybe 6-8 minutes per knead and see if that helps?
Thanks for your feedback!
I just realized it was probably because I used the dough hook both ten minute intervals. Not the smartest.
Just at a sandwich from the loaf I made though and it was great. 🙂
Fantastic!!!!
Mine started smoking too. I wonder if your stand mixer is just more powerful than a KitchenAid and thus able to handle more dough. But the bread turned out really yummy anyway 🙂 next time I’ll cut the recipe in half though so my KitchenAid can handle it.
This recipe was altered from the Kitchen Aid manual that my friend Angela had. I owned a JC Penney version. 🙂
Gotcha! I did call KitchenAid and they said it was smoking because I shouldn’t try to put more than 5 or 6 cups of flour in the KitchenAid. I’m sad because this is my favorite bread recipe! Do you think I can cut it down to 5.5 cups of flour and still have it turn out okay? Maybe if I cut back on the water and oil a little?
I’m not sure, Lauren…I know bread can be fickle, but you could give it a shot!
I made this 2 days ago. We had just received organic sucanat from a Vitacost order my husband had made, and I wasn’t sure what to do with it, yet. Then saw your comment about using it in this bread. So I made it, using 1/2 Bob’s Red Mill Organic Ivory Wheat and 1/2 Bob’s Red MIll Organic Stone Ground Whole Wheat. I have been trying different bread recipes to use for our sandwich bread over the last few months. And this one is THE BEST! I think this will be THE ONE. Thank you so much 🙂
I just got a new Kitchenaid Pro HD Mixer yesterday for my Birthday. Happy 56th to me. LOL. I found your recipe online and thought.. this doesn’t look too intimidating. Its the first time I have made bread from scratch successfully. It worked perfect. Thank you so much for the easy to follow recipe!!
That makes me SO happy!!! Happy Birthday!
This recipe has way too much fat and sugar in it for me. You only need a couple of tablespoons of oil or butter and the same for sugar. I never add more than that. It doesn’t alter the flavor at all but it does save calories and cholesterol. I would also use one egg not two for the same reason and increase the milk by 1/4 cup to compensate.
🙂 I’m glad you’ve found a recipe that works better for you!
I made this bread and it was delicious. There are some confusing bits, ESPECIALLY for first time bread makers. The long recipe shows regular oil and calls for sugar and does not give any quantities. The short version at the bottom calls for honey (not sugar) and coconut oil (not canola/veggie). This was my very first EVER attempt at making bread and did what I could. I used honey instead of sugar, but used canola oil as coconut oil is expensive ( i’d rather save coconut oil for my homemade chapstick). The bread came out pretty darn close to perfect. Some other adjustments were because I know my oven runs hot, I cooked for 20 mins instead of 30 mins. I did one regular loaf in a tiny pan and one round loaf. The pan loaf came out really good except the middle was still softer than I wanted. I’m sure lowering the temp and adding 5-10 mins will fix that. The round loaf came out perfectly and even help up for a Philly cheese steak sandwich for my husband. I would post pictures showing how awesome it came out, but the site says they are too large(?). Anyway, great recipe and a do over, today in fact.
🙂 That’s because when I originally wrote the recipe. I didn’t use those exact ingredients. So, over time as I’ve made things, I occasionally go back and fix the printable recipe with the EXACT ingredients that I use. A lot of people skip right to the printable anyway (Pinterest), so I was trying to get the most bang for my time. Hope that makes sense!
So glad it turned out well for you! Bread should be around 190 internal temperature, so I like to use an instant read thermometer these days and then I know it’s exactly right. Go forth, and make more bread! 🙂
is the white wheat flour “all purpose” or white wheat bread flour? I’m new to making bread, and hoping this will be soft enough for my picky kids who love their daily peanut butter sandwiches 🙂
White wheat flour is “all purpose.” 🙂
My new weekly recipe, thank you! I substitute sorghum molasses for the honey (it’s so much cheaper), 3 c whole wheat flour and 3 1/2 c bread flour. I also had a problem with the large quantity in my mixer. I cut a circle out of a plastic ice cream bucket lid, cut a cross in the center and forced the dough hook top through it. It keeps the dough from seeping up too high.
That’s a really great idea!
Can you use stone ground whole wheat? Does anything change?
I use fresh ground wheat just fine. 🙂
I make your recipe every week for my family! We just love it!! Thank you SO much for sharing! My only question is if you have made buns with it?
No, I always make my Hamburger Bun recipe. 🙂
http://www.stacymakescents.com/homemade-hamburger-buns
Just made this. It’s fantastic!! What a great recipe. Just for the record, I used white bread flour…should have used less water. I followed the recipe with 2 cups of water and it was almost too much for my 6- quart kitchen aid mixer to handle. I stopped half way through needing to give the mixer a break because it got so hot! I also used two teaspoons of yeast. I kinda guess at how much to use because the yeast quantity in the recipe is a little confusing to me at least.
I really apppriciate your picture directions and how you described your recipe. “Thou shall not kill” lol really made following a bread recipe enjoyable. Thanks again!
🙂 I’m so glad! For the record, one package of yeast = 2 1/4 teaspoons of yeast.
At last! Something clear I can undrastend. Thanks!
So you use sucanat instead of the honey? I can’t wait to try this.
Both work just fine. 🙂
Have you ever frozen the dough, and if so, at what point did you freeze the dough and how did you thaw it? We are making the bread several times a week, and I would love to make a bunch at one time and freeze. My family devours it!! 🙂
I have done that, but I don’t have as good of a rise as if I make it fresh. Once the dough has risen the first time, you can divide it and wrap it in plastic wrap and freeze in a Ziploc. Thaw in the fridge and then let it rise in the bread pans to bake.
this article was amusing to read. thanks for easy directions !
🙂 Thanks – I am an amusing person.
My dough came out very sticky, even after adding a total of 6.75 cups of bread flour…. I measured everything right. I don’t know if it’s the 80% humidity here, or if bread and I will never get along.
🙂 Sometimes you just have to keep adding flour until it looks right. But a wet dough is much better than a dry dough. I hope you baked it anyway. 🙂
I did! It was a big hit. It seems as though the dough is less sticky after it rises. I will be making it again! And my 1-year-old got a big kick out of me slapping the dough. He wanted to get in on the action.
Hey – I ain’t gonna lie…slapping dough is a lot of fun.
So, I tried making this again, with 3 cups of bread flour and 3.5 cups of whole wheat flour. It was TOTALLY different. It actually clung to the dough hook instead of looking soupy. It’s not even sticky. I think the type of flour makes a difference…
Oh yes. Wheat soaks up liquid like a sponge.
Not sure if you will see this comment in time, but I plan to give this a try during my son’s nap this afternoon – (this is my first time ever trying to make my own bread, so forgive these possibly simple questions :P) 1. I only have one loaf pan, would I be better off halfing the recipe? or do i have another option to keep the dough ready to use until i have use of the pan again? — and 2. can the dough be frozen? if yes, at what point would you freeze it?
thanks!! 🙂
I always freeze my bread after it’s made – I just find that it does better.
Also, you don’t have to use a bread pan – you could use a round casserole dish or a glass baking dish. Like this: http://www.pinterest.com/pin/388857749050047016/
I don’t have any coconut oil! What is a good substitute for that? I have regular vegetable oil and I have crisco.
Butter and coconut oil can be used interchangeably. 🙂
Well dang… I’m out of honey 🙁 These kids and their insatiable taste for honey on waffles. Does anyone know of a good honey substitute?
Maple syrup. 🙂
That sounds delicious! Thank you 😀
I have made this recipe twice and it was great both times. One time I added whole wheat and still good. My mother LOVED it!
I use hard white wheat – sometimes I cut it with hard red. 🙂
I just made this recipe and LOVE it. This recipe is definately a keeper. Thank You for sharing
Hooray! Thanks for letting me know!!
can you do this without the hook? i have a kitchen aid mixer but no fun attachments! 🙂
The hook is what helps knead the dough. Have you thought about looking on eBay for the part? Maybe you could find it very cheaply. 🙂
This is now my go-to bread recipe. No more bread from the store! Just yummy home-made goodness. Thanks for this!
This recipe is easy enough but my kitchen aid mixer got very hot and started to smell. I used the correct amounts. I’m scared if I make it again it will burn up my mixer. 🙁
It might be that you have a lower horsepower machine – mine is pretty tough and it’s never had an issue. You can also mix this by hand if you want to. 🙂
Thank you so much for sharing the recipe! I just made it (first time ever making bread) and it turned out great! So excited to try more homemade breads and rolls – as I am trying to eliminate as much processed food/white sugar/ flour as I can from our diet. I used all Gold Medal natural whole wheat flour.
Check out my Honey Oat Bread recipe too – it’s our total fave! 🙂 Congratulations on your first loaf of bread! WOOHOO!!!!
I grind my own wheat into flour also and was wondering about your white wheat flour. I use prairie gold (which is hard white spring wheat)…is that what you used for this bread? I also have soft white wheat but I guess that’s more for pastry flour. And I have hard red wheat which I use as an all-purpose flour. Making bread has never been a gift of mine, so I’d like to try this bread!
Jen, I use the term “white wheat flour” because most of my readers don’t have a mill. 🙂 It just refers to the hard white wheat berries that I use – which is close to the equivalent of store bought white wheat flour. I always use hard white to make a yeast bread and soft white to make things that don’t require yeast (muffins, sweet breads, pancakes, etc). Hope that helps!! I love making bread, so ask anything you need to know. 🙂
Thanks for the reply! I just looked up what Prairie Gold wheat berries are and it says hard white spring wheat…so I guess I’ve been using it all along! lol
🙂 I think I’ve used that brand before…
I was wondering what I keep doing wrong. I’ve made this recipe a few times now and I can’t keep the dough from climbing up over my hook and making a big mess on the springs and the undercariage of the mixer. Do you ever have that problem?
I’ve had that problem with a few recipes, but not this one….what size is your bowl? When I do a recipe that I know is too large for my bowl, I stand there while it’s kneading and keep working it down with a wooden spoon. Hope that helps! 🙂
Have you ever tried greasing your hook? I think that might help? Good luck!
What kind of bread flour do you use?
These days I grind my own wheat, but I LOVE King Arthur flour. 🙂
Finally!! A bread recipe that rose and tastes good! Thank you sooooo much:) I was a little scared becasue I had to let it rise for about 2.5 hours but it is fabulous! I hope you don’t mind I am going to publish this on my fb page!
Thank you again…I love your site
Shawnarae
Share away! 🙂 I’m just tickled pink it turned out great for you!
As you know, I made this bread last week… I decided to share the recipe on my blog, and I linked it to your site.
Btw, I re-named the bread and I hope you don’t mind 😉 (I’ll post it sometime this week, just wanted to let you know ahead of time.)
Thanks Dianne! 🙂
So happy you shared this recipe! I’ve used it (and variations) for years and it’s a no-fail deal. I had to giggle at your “ready to bake” ramikin & egg 🙂 BTW, you can use this to make a simple cinnamon/raisin bread too. Just add a little more sugar, add your raisins the last minute or two of kneading with the mixer. Roll out each loaf, spread with melted butter & cinnamon sugar. Roll TIGHTLY into a loaf and bake as usual 🙂 Enjoy!
I’ve been making it for a while now. 🙂 I like to re-post old recipes in case people miss them. Not much better than cinnamon raisin bread!
Ask Angela if she’s ever made this with half whole wheat flour and half bread flour? I’ve done this with a lot of recipes and it works “most” of the time.
Yes, she has. 🙂 It’s in her notes. I use flour combos on it all the time. Today I used whole wheat and oat flour and it’s soooooooooooooooo good. This is my “go to” recipe.
Not really…lol…space is limited. I barely have room for the kitchen aid. The one she had had a cool chamber and a dry one. You could put everything in it at night and set a timer. We used to make cinnamon raisin bread and it would be hot and ready the next morning. It’s amazing what kids remember most. I won’t ever forget that.
My granny used to have a bread machine that we would use when I was there. I wonder if they still make those things?
I used to have one. I got rid of it. I hated it. LOL It made square loaves and they weren’t pretty. You can use them for just kneading, but why do that if you have a kitchen mixer? Same purpose – need to save my cabinet space. 🙂 If you’re in the market, you could probably find one at a yard sale.
Like this recipe too!!
S<
I have never used butter in it but I have used coconut oil, safflour oil, canola oil and they have all worked so I think it would.
This receipe is for me! Can’t wait to try it! Do you ever substitute butter for oil? Would it change the texture?
This is the first time I’ve made this bread. Maybe Angela would know……
LOL…my kids have actually stolen my dough hook for my kitchen aid to use as a pirate hook on several occaisions.